Set up a cheap cloud hosted adblocker in an hour for $2.50 a month

I recently got fed up enough with ads while regularly using my mobile Android Marshmallow phone (/cough Youtube, App games, Reddit) that it pushed me to investigate a simple means of getting rid of them. The conditions were that it has to be easy to setup, maintain, and wouldn’t require rooting the phone.

So I began looking for solutions and recalled that Vultr recently started offering very cheap cloud instances at $2.50 USD a month with 1 CPU & 512 MB RAM. I also remembered hearing about Pi-hole and thought it would be the perfect mix! Initially, I had a Raspberry Pi 3 B collecting dust and thought I could’ve gone that route. However, I figured at the $2.50 price point was worth not having to have the Pi stored in the closet somewhere, always on, connected to the local network and jigger with local internal network settings.  I concluded that the cloud solution would work perfectly.

I’m used to the smallest DigitalOcean or AWS instance I could find being in the area of $5 dollars a month. Which is why the cheapest Vultr instances caught my eye and I would rather have a dedicated instance just for this purpose, so as not to share space with any other instances running for other stuff.

Being new to Vultr, I signed up with a new account (affiliate link: Hey! more months of free adblocking if you find this useful).

They also had a “VULTRMATCH” promotion which doubles the credit for new accounts up to $100 match, so I ended up with $50 of credits which is good for 20 months of ad blocking on the cheapest instance.

(Edit 1: From reading the comments and after reading the promotion fine print, it appears that Credit is applied on a 50/50 basis, and will expire after 12 months. So if you’re looking for a year total of hosting for only this instance, $15 to then be doubled to $30 is the way to go. I’ll use my remaining balance on other projects instances, thanks Roque!)

Before launching the instance, use the “Looking Glass” links on https://www.vultr.com/faq/#downloadspeedtests page to check the nearest datacenters that have the lowest average ping time for your own IP, to improve latency when the ad blocking DNS requests go through.

4 packets transmitted, 4 received, 0% packet loss, time 3030ms
rtt min/avg/max/mdev = 21.622/23.718/25.440/1.500 ms

Result will vary; Los Angeles Datacenter it was!

Being that the vanilla Ubuntu 16.04 LTS release is the Linux distro most familiar to me, that one was used to launch the instance. IPv6 & Private networking & Key-based auth were enabled, in case I want to hook into this project instance in the future.

The Hostname & Label fields used were just ones of a domain I had laying around unused, collecting Internet dust. Vultr also has a DNS service on their web panel. It could be used to host NS and set the custom A & CNAME records from there, so my unused domains were also set to them. (The lowest TTL for the CNAME, A, NS record cache seems to be 120 seconds.)

Let’s get to the steps for installation:


1. Instance prep

After the instance is launched via the web panel, begin with the ssh’ing into it via root and running these commands for prepping it.

# SSH into the new instance
# Switch it out to be your servers IP
ssh [email protected]

# Get the latest packages updates
apt-get update

# Install the latest packages
# To get rid of the "67 packages can be updated." login notification
apt-get dist-upgrade -y

Not exactly sure about Vultrs’ default Ubuntu install, but to future-and-less-maintenance-proof the server even more, tutorials like https://help.ubuntu.com/community/AutomaticSecurityUpdates could be used to have the instance automatically receive updates. Not too concerned on future automatic updates breaking the application, as this will just be used for the ad-blocking project, not anything mission-critical.

1a. Creating Users

Just so the pi-hole application doesn’t get set up under root, we also need to create a user, just for it to run under.

adduser dnshole
# Put in a randomly generated password


# After dnshole user is created, allow sudo access to new user
visudo

# Then appended the dnshole line only, right below the root one.
# So it looks like this below

# User privilege specification
root    ALL=(ALL:ALL) ALL
dnshole ALL=(ALL:ALL) ALL

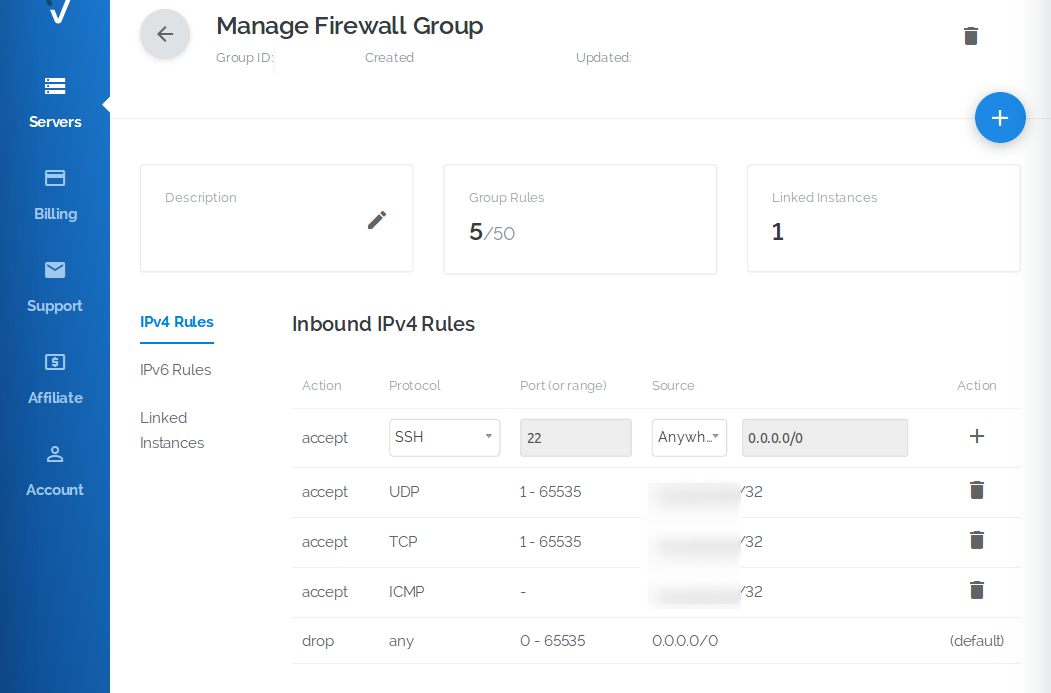
Vultr also has a firewall web portal on their web panel, that could be used to setup whitelisting rules for the purpose of only your IP being allowed to access the droplet. It secures down the instance even further and saves time from fudging around with Ubuntu’s internal ufw firewall tool, which contains the possibility of locking yourself out, if the ufw rules are messed up.


2. Installing Pi-Hole

After the custom non-root user is created, move on to getting Pi-Hole installed. I’m not one to pipe anything into bash without inspecting it, like they have listed for their installation. So I manually downloaded the file, inspected it, then piped it to bash from the local file.

# If you're still root
# Change your user to emulate running shell as dnshole user
sudo -u dnshole -s -H


# change directories into dnsuser's homedir
cd ~/


# Download pi-hole from master github repo
curl -O "https://raw.githubusercontent.com/pi-hole/pi-hole/master/automated%20install/basic-install.sh"

# View the file, that should have placed it into the current directory
ll basic-install.sh
-rw-r--r-- 1 dnshole dnshole 46743 Mar 10 23:16 basic-install.sh
# Inspect it to make sure it's the correct file

# Then running pipping it into bash to execute the installer
cat ./basic-install.sh | bash

It should ask you for the randomly generated dnshole users password to sudo, put that in, then it should take you through the installation steps, pressing <Enter> for the <Ok> acknowledgments.

There’s some options to use different public secondary DNS resolvers, I went with OpenDNS’s. Then selecting to configure to block: [*] IPv4  Block ads over IPv4 and [*] IPv6  Block ads over IPv6 options accordingly. I didn’t have to manually enter any details, as it seemed to have autodetected the server’s IPv4 & IPv6 address. For the “Firewall in use” it has some default configurations it installs; those could also be used, but I used Vultr’s additional one on top:

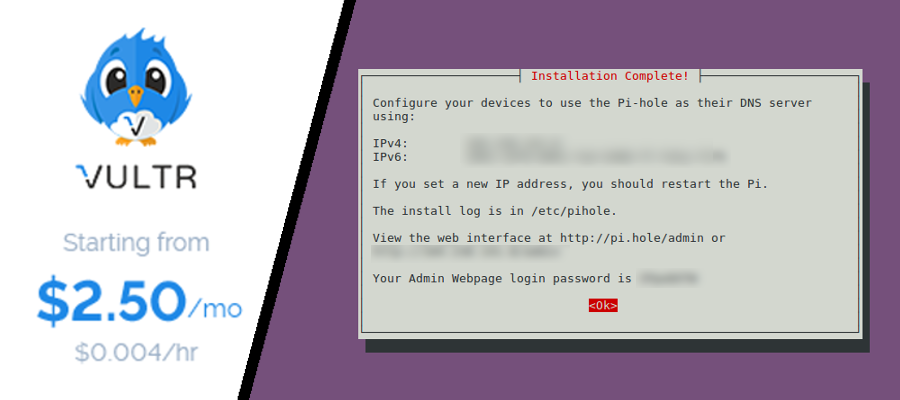
It installed with no hiccups and I was provided with the details, which I copied to store later locally:

┌───────────────┤ Installation Complete! ├────────────────┐
│                                                         │
│ Configure your devices to use the Pi-hole as their DNS  │
│ server as their DNS server using:                       │
│ using:                                                  │
│                                                         │
│ IPv4:        111.222.333.444                            │
│ IPv6:        2001:0db8:85a3:0000:0000:8a2e:0370:7334    │
│                                                         │
│ If you set a new IP address, you should restart the Pi. │
│                                                         │
│ The install log is in /etc/pihole.                      │
│                                                         │
│ View the web interface at http://pi.hole/admin or       │
│ http://111.222.333.444/admin                            │
│                                                         │
│ Your Admin Webpage login password is RANDomTXT          │
│                                                         │
│                         <Ok>                            │
│                                                         │
└─────────────────────────────────────────────────────────┘
  • IPv4 / IPv6 address and passwords will be different for you.

I confirmed the server itself was working with running dig locally for a known ad network URL:

# Change the IP to be the public one of the Vultr instance 
dig -t a +short doubleclick.net @111.222.333.444
111.222.333.444

If the response A record of the command is the instance’s own IP, then that means it’s correctly intercepting it. When it intercepts a known ad host DNS record, it will show a “Website Blocked” HTTP/1.1 200 OK with the message. (I was reading that there’s some public repo’s that could be used to replace the page to customize it, if wanted.)


3. Configuring Android

Now that the instance is setup and working. The phone’s DNS network settings has to be setup to use it for the DNS name resolver to finally block ads.

All help-articles online advise viewing the Android Wifi network setting the phone is connected to, then configuring it to use DNS1 setting as the defined one with the example settings below, which never worked for me.

Upon selecting "Manage network settings" for the local wifi network:

☑️ Show advanced options

IP Settings
 - Static ▼
   - IP address: 192.168.1.103 (Your phones local IP on the network)
   - Gateway: 192.168.1.1 (You phones local gateway)
   - Network prefix length: 24
   - DNS 1: Set the Ubuntu instances public IP address.
   - DNS 2: (empty)
 - Proxy: None

This seemed to be the hardest step, due to it not initially working when attempting it. It may work for you, but in viewing the Pi-Hole web panel after logging in, MAIN NAVIGATION >> Tools >> Tail pihole.log page wasn’t scrolling when attempting to browse apps on the phone.

I wasn’t going to go on a journey to root the phone for it to work. So I ended up having to download and install the DNS Changer app, then configured it to use the instance’s public IP address as the “DNS 1” option. Then I used OpenDNS as the second “DNS 2” option, as the field was required and clicked on Start. The app appears to create a VPN tunnel to work in setting up the DNS resolver correctly. I received the warning, and acknowledged it.

If you have better recommendations for getting it to work without an app, I’d be open to hear and will update this post. But everything online led to Android falling back to use Googles default 8.8.8.8 DNS resolvers, regardless and overriding any custom setup options in the phone’s network settings.


Conclusion

A weekend in, so far it has been good to see a lot less ads on the mobile apps. With Youtube, the ad at the beginning of videos seem to sometimes still pop up, but I haven’t noticed the ad that plays in-between the video yet. The video history also seems to have stopped, but I’m fine with giving up video history in exchange for ads.

If any issues arise, those take some debug-time to figure out. Regardless, I hope this helped with the basic setup!

Edit 1Hacker News comments: https://news.ycombinator.com/item?id=13852109

Dell XPS 13 with Ubuntu 16.04 and upgrades

I recently needed an upgrade from my 4 year old, 6 pound Lenovo IdeaPad Z580 laptop that doesn’t last close to an hour on battery life anymore, so I went shopping around to find a lighter weight upgrade.

After seeing a bunch of good customer reviews, video reviews and seeing it had decent Linux support, I landed on choosing the Dell XPS 13 i5 Skylake ultrabook as the replacement.

Some things I didn’t need in the replacement criteria were the touch screen. It’s just a personal preference that I don’t want on a laptop and didn’t want to sacrifice battery life for something I don’t use, along with being a lot cheaper.

What surprised me, was that the 256 GB SSD option was priced at $615+ more than the 128 GB SSD option. I already knew I was going to swap out the M.2 SSD as soon as it came for a 500 GB SSD priced at $180, so that saved quite a bit of money buying it separately.

  1. Items Purchased
  2. Windows / Updates
  3. Opening it up to upgrade SSD & Wifi chip
  4. Ubuntu 16.04 Install
  5. Compatibility & Support issues
  6. Dell USB-C Adapter


1. Purchased Items:

When it first came in the mail, I was really trying and willing to give Windows 10 Home a shot as I hadn’t used it in while since Windows 7 and it’s their latest *newest* offering. This soon changed on running into issue after issues, trying to get the operating system updated to have the latest Windows updates and security patches.

By default it booted Windows up fine, so I did what everyone mentioned to do and installed the latest BIOS drivers. The version it came with was v. 1.0.0 installed. So that was updated to Dell XPS 13 9350 System BIOS v. 1.3.3 located at:

http://www.dell.com/support/home/us/en/19/product-support/product/xps-13-9350-laptop/drivers/advanced

The Bios update went pretty smoothly. I then installed their 4 Urgent other upgrades to get it up to speed with Windows 10 too.

  • Intel HD Graphics Driver
    • 9350_Video_Driver_9NXMH_WN32_20.19.15.4390_A04.EXE
  • Intel(R) Thunderbolt(TM) 3 Firmware Update
    • Intel_TBT3_FW_UPDATE_NVM16_A03_02.12.07.exe
  • Intel(R) Thunderbolt(TM) 3 Firmware Update
    • Intel_TBT3_FW_UPDATE_NVM16_A03_02.12.07.exe
  • Intel Thunderbolt Controller Driver
    • 9350_Chipset_Driver_2V6DD_WN32_15.3.39.250_A01.EXE

These also installed just fine & didn’t have many issues, just a few reboots needed for each one. This is when it came time to update Windows itself.

2. Windows / Updates

I naturally thought it would be as simple as going to the Windows Update settings screen & letting it do its’ work. I was met with a problem error screen and a [Retry] button which didn’t do anything.

Windows Update

There were some problems installing updates, but we’ll try again later. If you keep seeing this and want to search the web or contact support for information, this may help: (0x80240fff)

[Retry]

No amount of reboots or clicks on the Retry button solved any issues. Doing a bit of Googling for the “0x80240fff” error and support forums later, some of the things attempted to fix were:

  • Stopping the BITS, Cryptographic, MSI Installer and the Windows Update Services via cmd prompt as admin user.
  • Using the Windows Update Automated Troubleshooter. Each time in ‘Find and Fix problems’ it said it found issues & they were fixed, but still no updates installed.
  • Booting up in safemode w/ networking enabled, doing the same as above. (Although it didn’t see any of the wireless networks or didn’t seem to recognize the Broadcom wifi card, so it didn’t have an internet connection)
  • Tried a clean Windows 10 install from the recovery boot mode, to do a clean install. Thinking it may have been some option I selected in install.

But still nothing. After many hours of debugging later, I attempted to download their Media Creation tool in https://www.microsoft.com/en-us/software-download/windows10/ (Even though it was already Windows 10) . It seems to have kickstarted the Updates, but it soon installed a clean Windows 10 install with none of the Broadcom wifi chips drivers.

On reboot of the re-install, I was also met with the new blue screen that it couldn’t boot. Specifically, showing:

Your PC ran into a problem and needs to restart. We’ll restart for you.

If you’d like to know more you can search online later for this error: SYSTEM_THREAD_EXCEPTION_NOT_HANDLED

I know the correct way is to always get the Windows ISO from Microsoft themselves, and not deal with the bloatware that may come pre-installed. But at this point, with no internet and the laptop not having an Ethernet cable to hardwire it in, I gave up.

Knowing I wasn’t going to be using the SSD in it with Windows anyways, I began switching it to a Linux computer (yay!).

3. Opening it up to upgrade SSD & Wifi chip

It was relativity easy to open it up with the help of a T5 screen driver & a Phillips #0 screwdriver for the 1 screw under the spring-loaded flap that shows the laptop model details.

Some youtube videos of other people doing and this ifixit page later:

dell xps lid off

(Image with the previous ssd unscrewed and the new SSD & Intel wifi chip on the right)

I was soon upgraded to a new clean 500 gigabytes M.2 SSD and the better supported Intel Wifi chip. On all previous laptops and desktop, I’ve had bad experiences with anything Broadcom chips and Ubuntu support related. So I avoid it as much as possible, to save precious debug time of having to find and download custom github repos and also compiling the libraries. Only to have to redo compiling them on every core Ubuntu update.

Note: The RAM is soldered onto the motherboard, so there’s no manually upgrading that. Which is why I chose the 8 GB RAM option, as it will stay on there for the life of the laptop.

4. Ubuntu 16.04 Install

After inserting the bootable flash drive with the latest Ubuntu Desktop Xenial Xerus version. I booted up and went through the regular Ubuntu installer to get it installed without any issues.

I was met with the Dell Support Assist Bios screen after the first boot with new hardware, but it didn’t have any issues recognizing the new SSD or anything else.

After the Ubuntu install, the Wifi card worked right out of the box and didn’t run into any compatibility issues. The mouse trackpad, screen, brightness shortcut, volume mute/up/down key worked too. (Although it doesn’t seem like the media shortcut: previous, play/pause & next keys do).

I just needed to fix the display resolution, as text was tiny while first logged in.

# Linux kernel details
$ uname -r
4.4.0-22-generic

For my install, I also have the encrypted LUKS filesystem along with the Encrypted Home folder for users. I’ve yet to have data loss issues on it and it looks to also be fully supported & compatible, so far.

By fault of my own: There’s been a time where I’ve accidentally cleared the fat32 /boot/efi partition on my previous LUKS disk mounted laptop. This was due to trying to mount a 2nd SSD and then installing a different Ubuntu version on it (thinking it wouldn’t touch the 1st primary SSD boot record that was already there, it did, lesson learnt). Don’t quite remember the details of how I recovered. But after much debug time, I was able to find out the issue with the Boot-Repair utility, along with the Ubuntu live bootable USB to recover/backup my home files and do a clean install again.

5. Compatibility & Support issues

It’s only been a few days, but the only issue ran into was when restarting from hibernation the machine reboots.

To fix: I logged into BIOS by pressing F12 to change RAID to AHCI mode in the settings, and that fixed the reboots.

No networks issues:

This was quickly fixed by running this script & creating a bash file on my desktop whenever I saw it occurred:

# See details
iwconfig

# Add wifi card
# Change out wlp58s0 for the network device turned off
sudo ifconfig wlp58s0 up

# Restart network-manager
sudo service network-manager restart

# See details after restart
iwconfig

This then got the Wifi networking working again without needing to reboot within the current logged in user session.

5. Dell USB-C Adapter

I may have to touch up on the Dell USB-C to HDMI/VGA/Ethernet/USB Adapter in a follow-up post later. So far out of the box, it has only supported the HDMI & VGA to external monitors. Not both at the same time for a 3 screen multi-monitor setup though.

By design it doesn’t seem like the HDMI and VGA cables fit at the same time, so I hacked up an extra VGA cable by using pliers to remove the blue casing with screws that lock it into cases and cutting the metal hole on the right side to both fit, but no luck getting both to work simultaneously.

dell-adapter-usb-type-c-to-hdmi-vga-ethernet-usb-da200-modifiedI asked at the Microsoft store about this exact dual-screen situation with the adapter and they mentioned it would work, but no luck! (Haven’t tried it on Windows, sorry)

When the HDMI was first plugged in, it was recognized in the All Settings >> Displays setting screen automatically, but it didn’t work due to the resolution it was sending the external screen was to high. As soon as that was lowered via the drop down list, the deskop displayed fine on both screens. My theory is something HiDPI related causes

The xrandr command will show that both screens are detected.

# HDMI only plugged into adapter
$ xrandr 
Screen 0: minimum 8 x 8, current 2808 x 1099, maximum 32767 x 32767 
eDP1 connected primary 1368x768+1440+331 (normal left inverted right x axis y axis) 294mm x 165mm 
   1920x1080     59.93 +  59.93   
   1680x1050     59.95    59.88   
   1600x1024     60.17   
   1400x1050     59.98   
   1600x900      60.00   
   1280x1024     60.02   
   1440x900      59.89   
   1280x960      60.00   
   1368x768      60.00*  
   1360x768      59.80    59.96
...

DP1 connected 1440x900+0+0 (normal left inverted right x axis y axis) 598mm x 336mm 
   1920x1080     60.00 +  50.00    59.94   
   1920x1080i    60.00    50.00    59.94   
   1680x1050     59.88   
   1280x1024     75.02    60.02   
   1440x900      59.90* 
...

DP2 disconnected (normal left inverted right x axis y axis) 
HDMI1 disconnected (normal left inverted right x axis y axis) 
HDMI2 disconnected (normal left inverted right x axis y axis) 
VIRTUAL1 disconnected (normal left inverted right x axis y axis)

The screen ratio was off, as it needs 1920×1080 (16:9) option selected. But when that happens it thinks it has no signal, so I needed to play with it a little to get it working. With the help of http://askubuntu.com/a/19956

For USB/Ethernet in both attempts, I haven’t been able to get the external USB to recognize a flash drive or the Logitech mouse usb dongle. I also attempted to plug in an Ethernet hardline on the other side, to test getting internet but it also doesn’t seem to recognize it, even though the green light on the adapter does light up.

We will have to re-visit making USB/Ethernet compatible, some missing updates or find an alternative but I could live with only HDMI working for now. Let me know if you have some better alternatives!

Hello world!

Welcome to WordPress. This is your first post. Edit or delete it, then start writing!